Deploy stage
The Deploy Stage is where your SAM application and all its resources are created an in an AWS account. The most common way to do this is by using CloudFormation ChangeSets to deploy. This means that this stage will have 2 actions: the CreateChangeSet and the ExecuteChangeSet.
Add the Deploy stage to your pipeline-stack.ts:
// Deploy stage
pipeline.addStage({
  stageName: 'Dev',
  actions: [
    new codepipeline_actions.CloudFormationCreateReplaceChangeSetAction({
      actionName: 'CreateChangeSet',
      templatePath: buildOutput.atPath("packaged.yaml"),
      stackName: 'sam-app',
      adminPermissions: true,
      changeSetName: 'sam-app-dev-changeset',
      runOrder: 1
    }),
    new codepipeline_actions.CloudFormationExecuteChangeSetAction({
      actionName: 'Deploy',
      stackName: 'sam-app',
      changeSetName: 'sam-app-dev-changeset',
      runOrder: 2
    }),
  ],
});
The highlighted code is the new addition:
// lib/pipeline-stack.ts

import * as cdk from '@aws-cdk/core';
import s3 = require('@aws-cdk/aws-s3');
import codecommit = require('@aws-cdk/aws-codecommit');
import codepipeline = require('@aws-cdk/aws-codepipeline');
import codepipeline_actions = require('@aws-cdk/aws-codepipeline-actions');
import codebuild = require('@aws-cdk/aws-codebuild');

export class PipelineStack extends cdk.Stack {
  constructor(scope: cdk.Construct, id: string, props?: cdk.StackProps) {
    super(scope, id, props);

    // The code that defines your stack goes here
    const artifactsBucket = new s3.Bucket(this, "ArtifactsBucket");

    // Import existing CodeCommit sam-app repository
    const codeRepo = codecommit.Repository.fromRepositoryName(
      this,
      'AppRepository', // Logical name within CloudFormation
      'sam-app' // Repository name
    );

    // Pipeline creation starts
    const pipeline = new codepipeline.Pipeline(this, 'Pipeline', {
      artifactBucket: artifactsBucket
    });

    // Declare source code as an artifact
    const sourceOutput = new codepipeline.Artifact();

    // Add source stage to pipeline
    pipeline.addStage({
      stageName: 'Source',
      actions: [
        new codepipeline_actions.CodeCommitSourceAction({
          actionName: 'CodeCommit_Source',
          repository: codeRepo,
          output: sourceOutput,
        }),
      ],
    });

    // Declare build output as artifacts
    const buildOutput = new codepipeline.Artifact();

    // Declare a new CodeBuild project
    const buildProject = new codebuild.PipelineProject(this, 'Build', {
      environment: { buildImage: codebuild.LinuxBuildImage.AMAZON_LINUX_2_2 },
      environmentVariables: {
        'PACKAGE_BUCKET': {
          value: artifactsBucket.bucketName
        }
      }
    });

    // Add the build stage to our pipeline
    pipeline.addStage({
      stageName: 'Build',
      actions: [
        new codepipeline_actions.CodeBuildAction({
          actionName: 'Build',
          project: buildProject,
          input: sourceOutput,
          outputs: [buildOutput],
        }),
      ],
    });

    // Deploy stage
    pipeline.addStage({
      stageName: 'Dev',
      actions: [
        new codepipeline_actions.CloudFormationCreateReplaceChangeSetAction({
          actionName: 'CreateChangeSet',
          templatePath: buildOutput.atPath("packaged.yaml"),
          stackName: 'sam-app',
          adminPermissions: true,
          changeSetName: 'sam-app-dev-changeset',
          runOrder: 1
        }),
        new codepipeline_actions.CloudFormationExecuteChangeSetAction({
          actionName: 'Deploy',
          stackName: 'sam-app',
          changeSetName: 'sam-app-dev-changeset',
          runOrder: 2
        }),
      ],
    });

  }
}
Deploy the pipeline
On your terminal, run the following commands from within the pipeline directory:
cd ~/environment/sam-app/pipeline
npm run build
cdk deploy
The CLI might ask you to confirm the changes before deploying, this is because we are giving Admin permissions to the IAM role that deploys our application. This is generally not a bad practice since this role can only be assumed by CloudFormation and not by a human, however, if your organization has a stricter security posture you may want to consider creating a custom IAM deployment role with a fine grain policy.
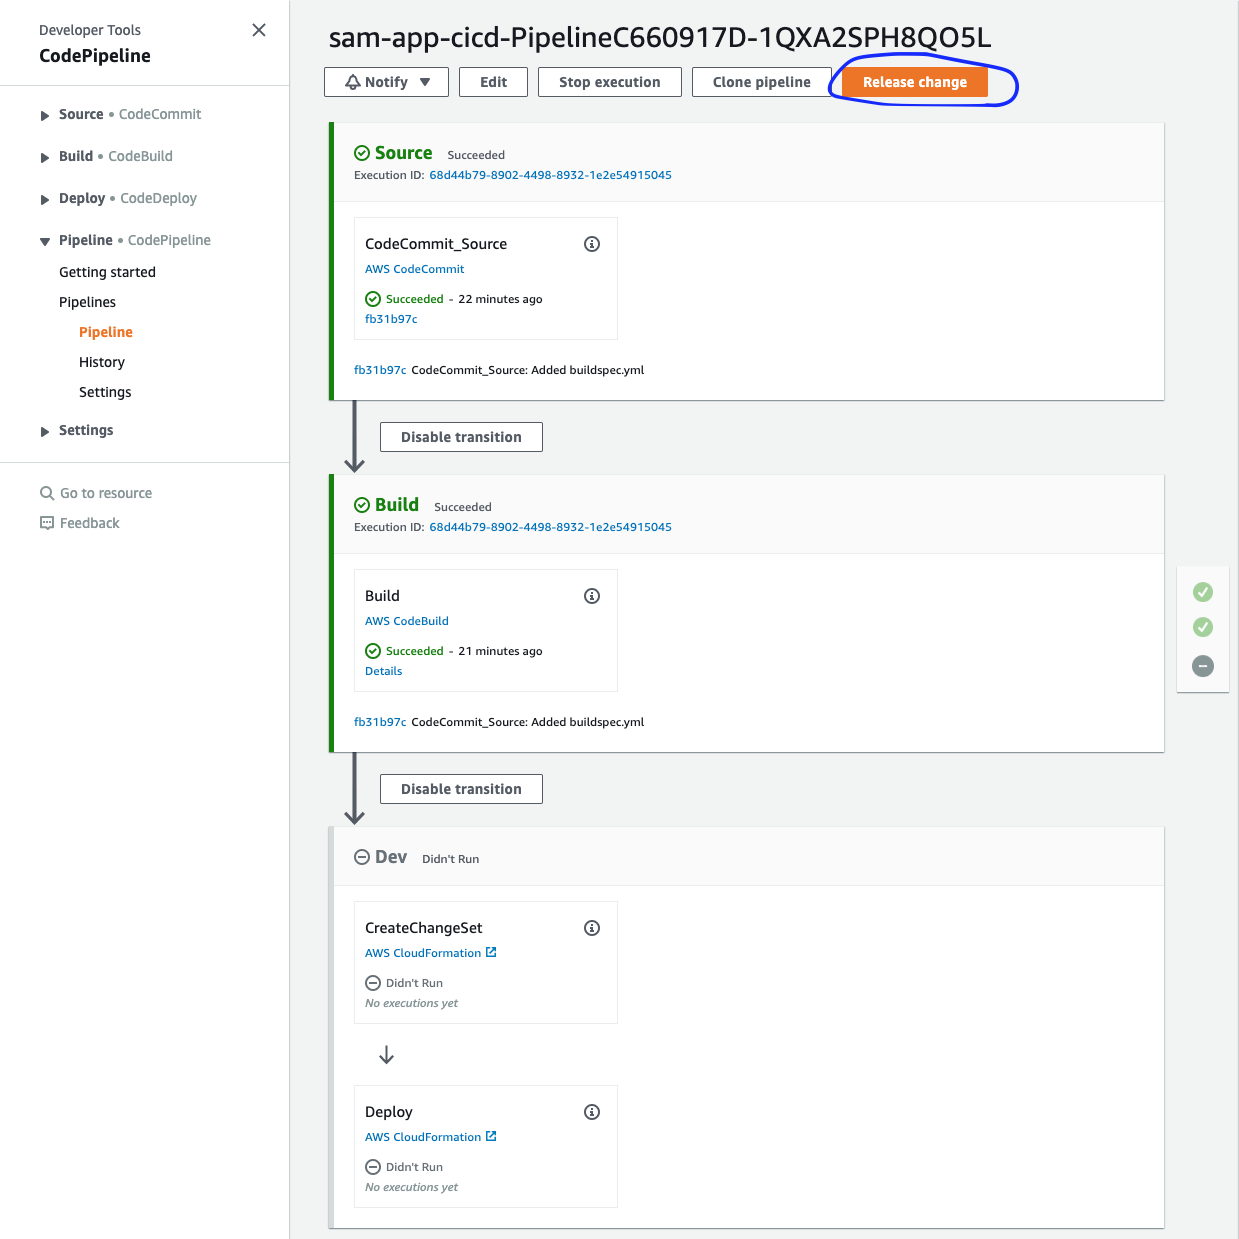
Trigger a release
Navigate to your pipeline and you will see the Deploy stage has been added, however, it is currently grayed out because it hasn’t been triggered. Let’s just trigger a new run of the pipeline manually by clicking the Release Change buttton.